You have 0 items in your cart
Front End Maintenance Tips
Question: How do I know when my front end needs maintenance? I know that my service manual and motorcycle dealer make recommendations but I would like to know how I can tell when I have an issue that requires servicing.
To read part one, click HERE
Hand controls and Brakes
You can’t afford to have controls that don’t work on your handlebars. It pays to check them for proper operations. If a button is not working try spraying a bit of WD40 or a fine mechanic oil spray in it, then let it sit for 5-10 minutes. Try to loosen whatever corrosion might be blocking them by pressing the buttons or switches many times. If they still don’t work and you feel comfortable doing so, take the switches apart and check the connections.
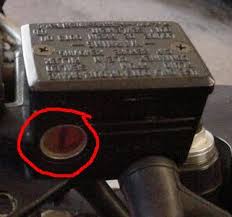
Brake and clutch control maintenance: Make sure all fasteners are tight to their specifications (check owners manual). For Harleys, check the brake fluid cap. If the rubber is sticking out the sides it’s too tight. Brakes are easy if you know what to look for. Make sure there is a good feeling in the lever. It should not go all the way to the grip. When pulled the pressure shouldn’t seem to fade away. All rubber lines MUST be changed every 5 years or when damaged. A good trick for spongy brakes is to take a cable tie, Zip strip, or any kind of strap you can tighten down and wrap it around the grip and brake lever. Tighten it down as far as you can, all the way to the grip. Turn the bars so that the fluid reservoir is the highest point in the system, usually all the way left, then leave it overnight. Doing this allows all the trapped air to rise to the top and will do wonders.
All brake systems using DOT 3, 4, or 5.1, NOT DOT 5, must be changed every 2 years maximum or sooner. This type of brake fluid is hygroscopic, which means it pulls water out of the air and any water concentration over 2-3% is not good. It lowers the fluid boiling temperature and when it boils (normal riding causes the brakes to heat up easily to 80-150°C) it causes bubbles in the brake system. This can cause your brakes to either stop working, or even worse seize, causing your brakes to lock and the bike WILL go down.
Front wheel
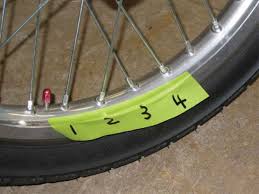
Check your tire tread depth based on manufacturer specs. Tires and tubes for spoked wheels need to be changed every 5 years max, same as all rubber lines for brakes and fluids. Tire pressure is extremely important. Refer to your owner’s manual and tire manufacturer for proper pressure based on your load, passenger, luggage, etc. For spoked wheels take a small screwdriver or wrench and tap on all the spokes. It should make a nice “Ting” noise and they should all sound around the same when they are tight. If you get any that make a lower pitch “Tung” then those are loose. Unless you know how to lace wheels, take it to a dealer or local shop that can work on spoked wheels and have them set the spokes torque to spec.
Have a great day and remember to keep the Shiny side up!
Written by – Chris Holland
DIY Series
ROAD GUARDIANS DISCLAIMER: Chris has agreed to be our Road Guardians Member “personal mechanic” and service guru. While Chris is located in Germany and is unable to service your ride, he is available to answer questions and give common sense advice. If you have a question that you would like Chris to comment on please let us know. Note that Road Guardians does not employ Chris and is in no way responsible for advice given or implemented. This information is intended as informational only and is not intended to take the place of regular maintenance by a certified mechanic.

